Wireless extenders get their input signals from a host router or modem. The whole purpose of a wireless range extender is to take in the WiFi signals from the main router and extend them further outside the range of the router. So, if you have certain areas in your home where you need WiFi signals but they are out of the router’s reach, get a WiFi extender. Connect extender to router and eliminate WiFi dead zones.
Are you facing issues to connect Netgear WiFi extender to Starlink router? You’ve reached the right post wherein we have discussed what you need right now, i.e. the topmost fixes to fix the extender-router connection.
How to Connect WiFi Extender to Starlink Router?
One of the major reasons why users face connectivity issues between their Netgear WiFi extender and host router is that they do not use the correct steps. To rule out the possibility of this cause for your case, ensure following the right steps. Here, we have discussed them for you to refer to.
- Place the Netgear WiFi extender near the Starlink router. THE EXTENDER MUST SIT WITHIN THE ROUTER’S RANGE.
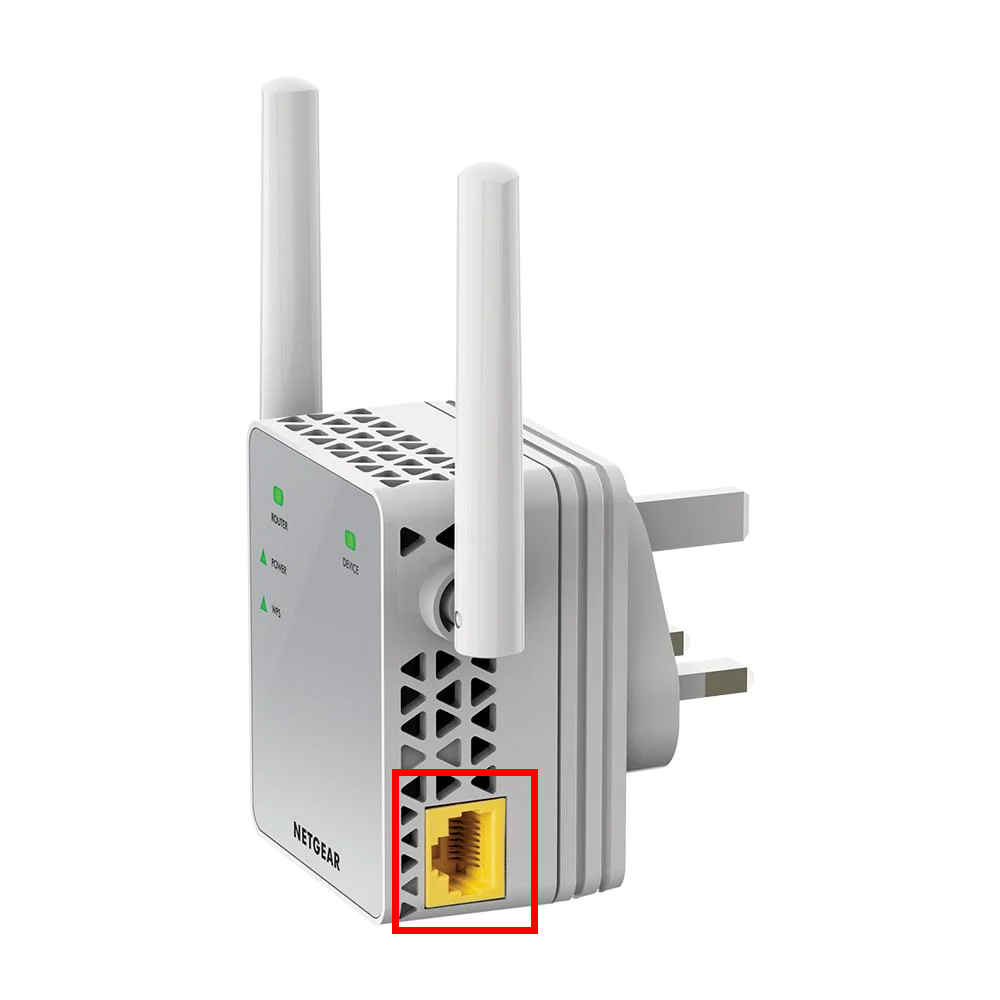
- Using a LAN cable, join the LAN port on the router to the Internet port on the extender. You can make a wireless connection as well.
- Plug the router into a wall outlet and turn it on first and then turn on the extender. FOLLOW THE SAME SEQUENCE in order to avoid any issues while connecting them.
- Join the extender’s network on your phone or PC using the default SSID Netgear_ext.
- Launch an UPDATED internet browser and Visit mywifiext.net in the address bar.
- Follow the prompts and complete the connection and carry out Netgear extender setup.
Let’s Fix WiFi Extender & Host Router Connection Error
Even after applying the correct steps if the connection does not happen then you are required to try the solutions highlighted in this section.
Make a Firm LAN Connection
The chances of connectivity issues between the extender and Starlink extender increase if you are using a damaged LAN cable to make a connection. Examine the cable that you’ve used and see that it isn’t damaged. Plus check that the cable is inserted into the right ports as mentioned above. Disconnect the cable once and clean the ports using a soft brush and make a firm connection once again.
Supply Sufficient Power
Poor power connection results in partially booted up devices. The devices will keep getting disconnected this way. Thus you should check the power supply by having a good look at the power cable and the power sockets that are used. Make the required amendments and ENSURE A STABLE POWER SUPPLY to both devices i.e. the Netgear extender and Starlink router.
Use the Right WiFi Credentials
After you are logged in to your extender to configure it, you are asked to enter the router’s WiFi details. Make sure that you are entering the correct details to connect WiFi extender to Starlink router.
Update Your Router
A mismatch between the firmware versions on both devices can be a reason why you can’t get them connected. Try updating your router now. You ought to log in to your router to update its firmware. Each device is assigned an IP that is used to log in. Some routers use 10.0.0.1 as IP. The default IP for a Starlink router is 192.168.1.1.
Power Cycle Network
Give your home network a fresh start by performing a power cycle. Turn off the devices on the network which will include powering down the Netgear extender, Starlink router and the device that you are using to log in to complete the setup. After a gap of about 5 minutes, turn on the router and wait for 2 minutes. Next, turn on the extender and then the device after waiting for 2 minutes. Once the devices are powered up completely, go ahead and try to connect Netgear WiFi extender to host router.
The Closing Thoughts
The solutions discussed in this blog post will help you connect WiFi extender to Starlink router without getting stuck in between. By any chance, the connection fails even after all this, then reset your extender to factory defaults. Perhaps some configurations on the extender are stopping the connection. So, reset and restore the default values. Once done, try connecting the devices and setting up the Netgear WiFi extender.