Netgear Extender Setup | Netgear_ext
Thinking of doing a Netgear WiFi extender setup in your home? Don’t know how to setup Netgear extender via Netgear_ext? Well, you are on the right page! Here, you will get to know step-by-step instructions for Netgear WiFi extender setup. All set?
The most important point that you need to take care of is the prerequisites for hassle-free Netgear WiFi extender setup via Netgear_ext. Here are the necessary requirements for Netgear range extender setup:
- Place your Netgear range extender in the same room as that of your home router.
- The extender should get the proper power supply.
- Next comes a workable home WiFi network.
- It is always recommended to have more than two web browsers installed on your PC or laptop. A situation may arise when you fail to access the Netgear extender login page due to the web browser issue. In this case, you can go with another browser.
So these were some essentials to bear in mind prior to setting up a new Netgear range ext. Now, let’s proceed further with the Netgear WiFi extender setup instructions. Continue reading.
Netgear Range Extender Setup using Netgear_ext SSID
You can install a Netgear range ext via two methods: Manual method and WPS method. Let’s discuss both the methods one-by-one and make you understand how to setup Netgear WiFi extender with ease.
Netgear Extender Setup: Manual Method
This method of Netgear WiFi extender setup is also known as web browser setup. Follow the instructions given below to know how to setup Netgear extender manually using Netgear_ext SSID.
- Turn on your Netgear range extender by plugging it into an electrical outlet.
- Connect the extender and your router.
- Open any web browser of your choice.
- Navigate to the default mywifiext login web page.
- Create an account if you don’t have already to get success with the Netgear extender login process.
- Enter the default Netgear extender login details to reach the setup wizard.
- Choose the network you want to extend.
- At last, click on the finish button.
Kudos! You have successfully completed the new extender setup process using Netgear_ext. Now, you are free to place your Netgear range extender anywhere you like. After that, connect your client devices to the Netgear_ext (SSID) to enjoy an uninterrupted internet connection throughout your home.
How to Setup Netgear WiFi Extender Using WPS Method
WiFi Protected Setup or WPS is the easiest way for Netgear range extender setup. All you have to do is just go through the below-given steps: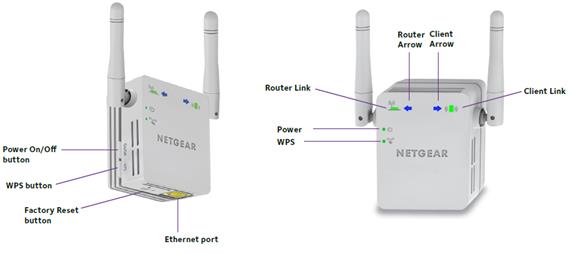
- Firstly, make sure that the extender is powered on.
- Find the WPS button on your device and press it for some time.
- Push the WPS button given on the existing router.
- The LED light will turn solid green showing that the router has configured with the extender properly
- For dual-band range extender, repeat the same procedure.
- Finally, connect to the extender’s network by accessing the Netgear extender login page.
- You can check the WiFi extender manual for the default username and password.
- Thus, your Netgear range ext has set up. Now, connect your WiFi devices to the extended Netgear_ext SSID and enjoy seamless internet connection all over the house or workplace.
In case you still can’t get success with Netgear range extender setup after reading the instructions given here, feel free to get in touch with our expert technicians. They will guide you with each and every step on how to setup Netgear extender.
Can’t setup your Netgear Extender? Contact our experts now.
Dial Toll-Free
Netgear Extender Manual Setup: Without Ethernet Port

Not all extenders are same! Some Netgear extenders don’t include an Ethernet port. Due to this, users get confused and asked something like this – How to setup Netgear extender manually as it is not having an Ethernet port. For some reason, my EX6200 is unable to do an Ethernet setup. Netgear extender login page never loads. What to do?
In case you are also having the same queries, we will tell you only one thing, i.e. walk through the steps listed below and complete a new extender setup without Ethernet port in minutes. No more need to wait!
- Reset your extender to the default factory settings.
- Next, connect to the extender device using a WiFi connection.
- Log in to the web user interface of your device.
- Once done, you will be prompted to enter the Netgear extender login username and your WiFi extender default password.
- After that, follow the steps of the installation wizard and establish a connection with your router.
- Lastly, connect your WiFi-compatible devices.
Still not able to complete your Netgear range extender setup? Get on-the-spot technical assistance from highly experienced technicians.
NETGEAR-EXT Setup
NETGEAR-EXT is the default extension for getting access to your WiFi range Extender. After the installation of Netgear range ext through mywifiext.net, devices like PC, laptop, smartphone, and tablet will access WiFi using extension.
Power on your extender. Then wait for the power LED to turn green.
Look and connect to Netgear_ext SSID (network name).
Major Issues During Netgear WiFi Extender Setup
To vanish this kind of Netgear extender technical issues, contact Netgear WiFi Extender setup experts.
- You are using the wrong web address.
- The web browser you are using is outdated and is accumulated with cache, cookies, and browsing history.
- Your computer is using a static IP.
- The extender is not providing you with a blazing-fast internet connection.
So, it is recommended to rectify the above mistakes. However, if all of your efforts go in vain and you still cannot get success with the Netgear extender login process, our experts are on their toes to help you.
The Most Common Problems during New Extender Setup
- Can’t access to mywifiext.net local.
- Weak/Improper WiFi signal strength.
- Inadequate or improper WiFi router range.
- How to set up the default password of Netgear range ext.
- How to setup Netgear WiFi extender.
- Not able to connect to extender’s default SSID.
- No blinking LEDs before/after extender setup.
- Problems with extender port configuration and settings.
- Unable to Log In to extender’s settings page.
- Lost/forgotten Netgear extender login password.
- Unable to proceed or login to NETGEAR Genie Smart Setup.
- Can’t find the Netgear_ext (SSID).
Can I add one more Netgear extender to my home network?
Using two Netgear extenders to enhance the existing wireless range in your home network is an excellent idea. But, make sure not to daisy chain the additional extender with the former one as it can affect the performance of the wireless client devices connected to your Netgear extender’s network. Apart from that, the additional extender won’t be able to work efficiently.
How do I get the best performance from my Netgear Nighthawk extender?
Execute the following tactics to extract the best performance from your Netgear Nighthawk extender:
- Place the Netgear extender in a zero-interference zone.
- Make sure not to select a corner to place your Netgear extender.
- Keep the firmware of your Netgear Nighthawk extender updated.
- Ensure that the Netgear extender and router are located in the same room.
Extend WiFi Speed with Netgear WiFi Repeater and Booster
Get rid of WiFi dead zones now with extender setup. The dead zone – that annoying spot in your home or workplace where you access no WiFi. With the metal objects, reflexive surfaces, architectural interference and other devices in the house, even the most powerful and fastest router can miss some spots. WiFi range extenders, also known as WiFi boosters and repeaters, are the best way to breathe life into dead zones. Thus, you can boost the signal of your home WiFi with great ease. The WiFi booster also comes with a manual to make the setup process easier like never before.
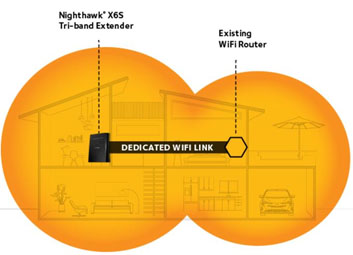
How Netgear Extender Works?
Netgear extenders are meant to extend the existing coverage area of your network. The Netgear range ext receives current wireless signals, uses the powerful antennas and amplifiers to repeat them and ultimately, extends the WiFi coverage. With the WiFi range extender setup, you can effectively double your wireless network range – reaching different floors, every corner in your house or workplace and even in your yard.
What sets WiFi extenders apart from others is their universal compatibility. These devices can work with any standard router available from any brand. They can even boost the WiFi signals coming from the router you get from the service provider.
Netgear WiFi Range Extender Design: Desktop or Wall-plug
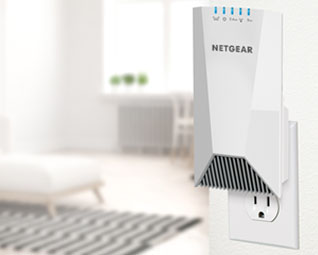
Netgear wireless range extenders come in two different form factors – for desktop placement and wall-plugged. Looking for a wire-free, less obstructive Netgear range ext design that fits perfectly within your home environment? If yes, look no further than a wall-plug extender. Just plug it in the wall and start enjoying the amplified WiFi range. On the other hand, if you are in the quest of up to four Ethernet ports to connect multiple wired devices, a desktop extender will certainly be your best bet. Some of the best WiFi extenders are:
- AC2200-Nighthawk X4S Tri-Band WiFi Mesh Extender (EX7500)
- Netgear WN2500RP
- Netgear AC1200-WiFi Range Extender (EX6150)
- AC750-WiFi Range Extender (EX3110)
- AC1200-Dual Band WiFi Range Extender (EX6200)
- AC3000-Nighthawk X6S Tri-Band WiFi Mesh Extender (EX8000)
- Netgear EX2700
- AC1750-WiFi Mesh Extender (EX6250)
These extender models will surely remove all the blind spots in your household and transform them into network efficient places. We hope now you will get to know how to setup Netgear WiFi extender.