A WiFi 6 router can transmit WiFi signals in different streams to different devices in the same transmission window. Thus, it offers improved WiFi performance even when there is a lot of network traffic. This post will help you understand how to connect extender to WiFi 6 router to achieve enhanced wireless network coverage.
Prerequisites to Connect Extender to WiFi 6 Router
The process of connecting a WiFi range extender to a WiFi 6 router will become a lot easy for you if you are aware of the prerequisites of doing that. Given below are the arrangements that you need to do before linking your devices:
- Complete the WiFi 6 router setup using the 192.168.1.0 or a similar IP address. Know that it will not be possible for you to connect the extender and router if your WiFi 6 router is not up and running.
- Perform a factory default reset of your WiFi range extender. An already configured extender cannot be connected to any gateway for amplification of signals. Majority of WiFi range extenders can be reset with a push of the Reset button.
- Take notes of the WiFi password of the WiFi 6 router. You are also supposed to be aware of its SSID. Without that, the connection won’t be possible.
Now that you are aware of the prerequisites of connecting your devices, it is time to pay attention to instructions to do that. For illustration, we have taken the example of a Netgear range extender. Check out the next section to learn how to associate your devices successfully.
Steps to Connect Extender to WiFi 6 Router
The process of connecting the WiFi 6 router and the Netgear range extender will only be possible if both devices are present in each other’s WiFi signal range. Therefore, if possible, keep your devices in the same room. Once done, follow the instructions mentioned below:
- Restart your WiFi 6 router and switch on your Netgear extender after that.
- After a while, switch on your PC and connect it to the WiFi network of your Netgear extender.
- By default, the Netgear extender broadcasts the network named Netgear_EXT.
- If you want to use a wired connection between your PC and extender, you may proceed.
- In case, you do not know the default password to join Netgear_EXT, check the user manual.
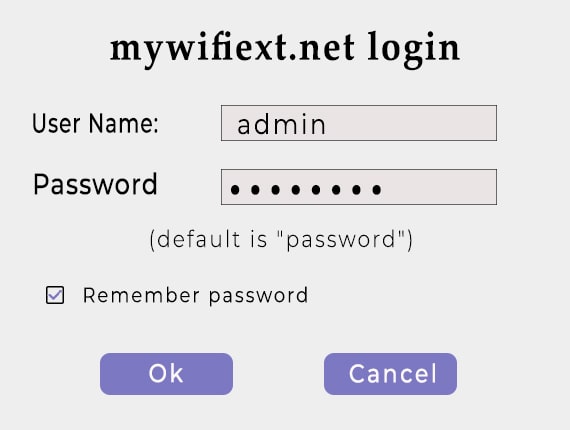
- Open a web browser after that and go to mywifiext.net or mywifiext.local depending upon the OS of the device you are using.
- This will open the Netgear extender login page where you have to enter “admin” and “password” into the Username and Password field respectively.
- The Netgear Extender Setup page will open.
- A network scan will happen now which will take you to the screen asking to select the network that you want to extend.
- Choose the SSID of your WiFi 6 router and enter the WiFi password if prompted to.
- On the next screen, you will be asked to give an admin password to the extender.
- After that, give separate SSIDs and WiFi passwords to the 2.4GHz and 5GHz networks.
- Upgrade the firmware of the Netgear extender as per the on-screen instructions.
- The Netgear extender will be successfully connected to the router if you keep following the on-screen prompts carefully.
In Conclusion
It is not very difficult to connect extender to WiFi 6 router. All you will need is an already configured WiFi 6 router and a range extender that is working on the default settings. After that you can connect them successfully by accessing the web GUI of the range extender. This is to inform you that some range extenders have a WPS button too. Therefore, if your extender and WiFi 6 router support the WPS configuration, you can connect them with a push of the WPS button.