So you’re trying to connect your WiFi extender to a new WiFi router. But connecting the devices seems next to impossible. Reading this blog post will be beneficial for you. How? This post covers the entire process of connecting a WiFi extender to a new CenturyLink router. Run through this blog to know some quick tips to avoid connectivity issues.
Let’s Connect WiFi Extender to New CenturyLink Router
You have replaced your WiFi router with a new CenturyLink router and are now trying to connect it to the extender. Since you are unable to get the devices connected, let us tell you that your extender is not ready for the connection. What does that mean?
Previously you connected the Netgear WiFi extender with the router. The extender still has the previous router’s configurations running on it. You first need to erase them so that it is ready to ed to the new router.be connect To get this task done you should reset the WiFi extender.
How to Reset Netgear WiFi Extender?
Resetting is a simple process that restores the default factory settings on the extender by wiping off the current configuration settings. Use the instructions given below to reset your extender:
- Remove any cable that’s connected to the Netgear WiFi extender apart from the power cable.
- Ensure that the extender is fully powered up and is connected to a well working power socket.
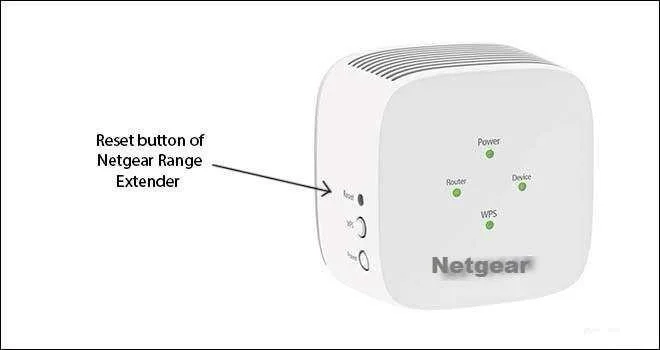
- Now, look for the Reset button on your extender. The button usually resides inside a hole labeled Reset or Factory Reset.
- With the help of a sharp and pointed object, press and hold the Reset button for at least 10 seconds.
- The extender will reboot itself and will be running on the factory settings.
The Netgear WiFi extender is now ready to be connected with a new CenturyLink router. Make sure that you have already set up the router with the internet modem or DSL gateway.
Netgear Extender Setup with CenturyLink Router
- Place the Netgear WiFi extender and WiFi router closer to each other.
- Use a LAN cable and link the Internet port of the extender to the LAN port of the router.
- Plug the router and turn it on and then turn on the extender. Following the same sequence is suggested to avoid any trouble.
- Now, connect your laptop, computer or phone to the extender’s network.
You can connect your PC using a LAN cable or connect the device to the extender’s WiFi network using the default SSID Netgear_Ext.
- Run a browser and you will land on the Netgear extender setup page directly. If the setup page does not open up on its own then use mywifiext.net or 192.168.1.250.
- Keep on executing the setup instructions the way they appear on the screen. Select CenturyLink router’s SSID when prompted to so that extender gets connected to its network.
You have set up your Netgear extender with a new CenturyLink router and made a successful connection between these two devices.
Do This Now!!
After setting up the extender with the router, you should,
Shift the Extender
Shift your Netgear WiFi extender to a new location. Choose a place where you wish to extend the router’s network. It must be within the network range of the router though.
Check for Firmware Updates
Check for firmware updates for the Netgear extender as well as CenturyLink router. Utilize the IP to log in to both devices and get them updated to the latest firmware version. The default IP for CenturyLink router is 192.168.0.1. However, IP may get changed to avoid IP conflict if the devices share the same IP. So, check the IP address assigned to your router first if the default one does not work. A different IP like 10.0.0.1 may also be assigned to your router. So, access the dashboard using 10.0.0.1 admin login details and check for updates for the router and get it updated.
Update Passwords
While you’re setting up the Netgear extender, you are prompted to update the admin and WiFi passwords for the extender. In case you haven’t changed them during the setup, then update the passwords now. This is to ensure the security of your network.
Let’s Conclude It
Using the instructions discussed in this post, you can easily connect the Netgear WiFi extender with a new CenturyLink router. We have helped you eliminate the obstacle that was preventing you from connecting the two devices. We’ve also provided you with the information on what you should do after setting up the extender with the router.
With the hope that the extender is ready to extend the new router’s WiFi, here we put a full stop to our helpful post.