If you have a Netgear range extender and want to connect it to your TP Link router, this is a must read blog for you. In this post, you will learn two different ways to connect Netgear extender to TP-Link router.
Steps to Connect Netgear Extender to TP Link Router
The two methods that can be used to connect a Netgear extender to a TP-Link router are – WPS method and Manual method. You can use any of them as per your convenience. However, this is to inform you that you need to reset your extender first. Only then you will be able to perform Netgear extender setup with TP-Link router.
1. WPS Method to Connect Extender and Router
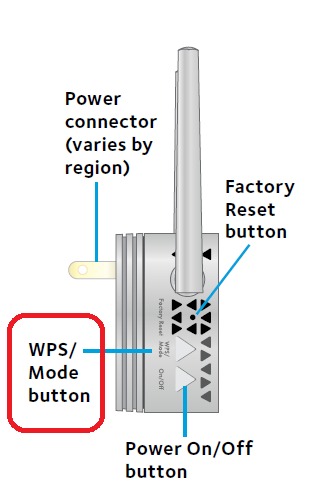
The WPS method to connect a WiFi range extender and the router is very easy. You just need to press the WPS button on both devices. The correct sequence of the process is given below:
- Keep your Netgear extender in the same room as your TP-Link router.
- Switch on your TP-Link router.
- The next turn is off your Netgear extender.
- Thereafter, find and press the WPS button on your Netgear extender.
- Look for the router’s WPS button and press it within 2 minutes of pressing the WPS button on the extender.
- The connection between your devices will be established.
- If your TP-Link router supports dual band functioning, you should press the WPS button again to connect your devices properly.
This is how you can connect Netgear extender to TP-Link router. You can now relocate your range extender so that every dead zone in your house will get an internet connection. But, remember to keep the extender in the router’s WiFi range.
2. Manual Method to Connect Extender and Router
To connect your Netgear extender and the TP-Link router manually, you will need the SSID and the WiFi password of your router. Thus, note down the password especially. Thereafter, place the extender in the same room as your TP-Link router and follow the on-screen instructions:
- Switch on the Netgear extender after your TP Link router.
- Connect your PC to the Netgear_EXTWiFi network by inputting the default WiFi password.
- Open a web browser and go to mywifiext.net.
- You will soon see a login window.
- Type in the default username “admin” and the default password “password” into the given fields.
- Click Log In and accept the terms and conditions.
- The extender will now scan the networks in its range.
- Choose your TP-Link WiFi network and input the WiFi password.
- Thereafter, assign WiFi settings for the 2.4 GHz and 5 GHz frequency bands.
- Give an admin password to your range extender and answer security questions.
- Keep the admin password and WiFi password different.
- Using the on-screen prompts, update the firmware of your extender.
- Register your extender on MyNetgear account.
- The connection is completed!
In this way, you can connect your Netgear extender and the TP-Link WiFi router. You must remember that entering the wrong WiFi password of the TP-Link router can interrupt the connection process. Thus, be very careful while entering WiFi password.
The Final Words
This was all about how to connect Netgear extender to TP-Link router. We hope that you will be able to connect your WiFi devices properly via one of the aforementioned methods. However, there is a third method too which uses the Nighthawk mobile app. It has a user-friendly interface and prompts you with on-screen instructions so that you can connect your devices effortlessly.