Got your hands on Amazon’s popular smart speaker Echo Dot? Powered by Alexa, Echo Dot features a sleek design and better audio. You can enjoy music, control smart devices in home, set timers, reminders, play jokes and quizzes and do much more on Dot. Echo Dot needs an internet connection to get all of these tasks done. So, you first need to connect your Alexa device to WiFi.
This guide will walk you through instructions on how to connect Echo Dot to WiFi extender. Bear in mind that the instructions provided here will help you connect your Alexa device to a WiFi router as well. So do not skip the post if you do not own a WiFi extender.
How to Connect Echo Dot to WiFi?
Use the instructions from this post and get your Alexa Echo Dot connected to your Netgear WiFi range extender and begin enjoying its splendid and impressive features.
Before you begin, power off the Alexa Echo Dot for some time.
1st Step: Download the Alexa App
Echo Dot can be managed and set up using the mobile app named Alexa app. You can download the Alexa app on your phone or tablet. The app can be installed on both Android and iOS platforms. Head to the Apple App Store or the Google Play Store and download the app.
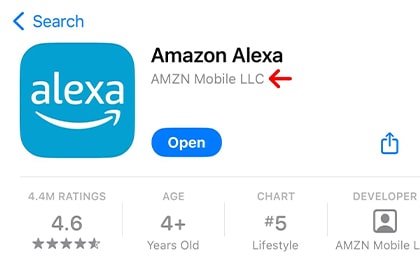
Note: A lot of fake Alexa mobile apps can also be found on the Application Store. Make certain that the one that you’re installing is the genuine one. It should be from AMZN Mobile LLC.
2nd Step: Verify Netgear Extender Connections
Netgear WiFi extender should be working properly before you connect Echo Dot to its WiFi. So, verify its connections thoroughly. See to it that its connection with the host router is well intact. We suggest you make a LAN connection to prevent signal disconnections. We also suggest you get your extender’s firmware updated to the latest version. Reach your Netgear extender admin dashboard using IP 192.168.1.250 and install the most recent firmware version.
Pro Tip: Most smart home devices connect to 2.4 GHz network. So, consider switching to a 2.4 GHz network on your WiFi extender.
3rd Step: Power Up Echo Dot
Put the Amazon Echo Dot to a well working wall outlet to supply power to it. Make sure that it is placed within the range of the WiFi extender so that it can receive WiFi signals without any trouble.
4th Step: Connect Echo Dot to WiFi
Connect your phone to the Netgear extender’s WiFi now. Run the Amazon Alexa app on your phone. Follow these steps now:
- Tap on More and then tap Settings.
- Next, select Device Settings by tapping on it.
- Scroll up or down and select Echo Dot.
- Under STATUS, tap Wi-Fi Network.
- Tap on Change.
- On your Echo Dot, push and hold the Action button. Hold it till the light turns orange.
- Next, tap Continue.
- As soon as the light turns orange, tap Yes. This implies the device is ready to be set up.
- Move to the WiFi settings on your phone now and choose a network name like Amazon-xxx.
- Get back to the Alexa app and let it discover available WiFi networks.
- Select the Netgear WiFi extender’s SSID from the list. Insert the WiFi password.
- Let the Dot make the connection.
- Once the connection is made, tap Continue and you’re done making the WiFi connection.
This is how to connect Echo Dot to WiFi extender. Your Dot is now ready to use. Play music, set reminders, play jokes and do much more on it.
Final Words
This brings an end to our informative blog post. Your Netgear extender WiFi settings are now saved on your Alexa device. Now onwards, your Echo Dot will connect automatically to its WiFi. Now that you know how to connect Echo Dot to WiFi, if you ever feel the need to change the WiFi network, use the same steps to connect your Echo Dot to new WiFi.